An In-Depth Guide to WireGuard VPN Configuration
Table of Contents
Introduction
WireGuard is a modern general purpose VPN (Virtual Private Network) protocol that aims to achieve higher security and performance than older alternatives such as IPsec or OpenVPN. It also strives for simplicity both in its implementation and in its configuration. Originally written for the Linux kernel in under 4,000 lines of code, it is now cross-platform, including mobile operating systems. Further details, including its source code and a white paper, are available on WireGuard's website.
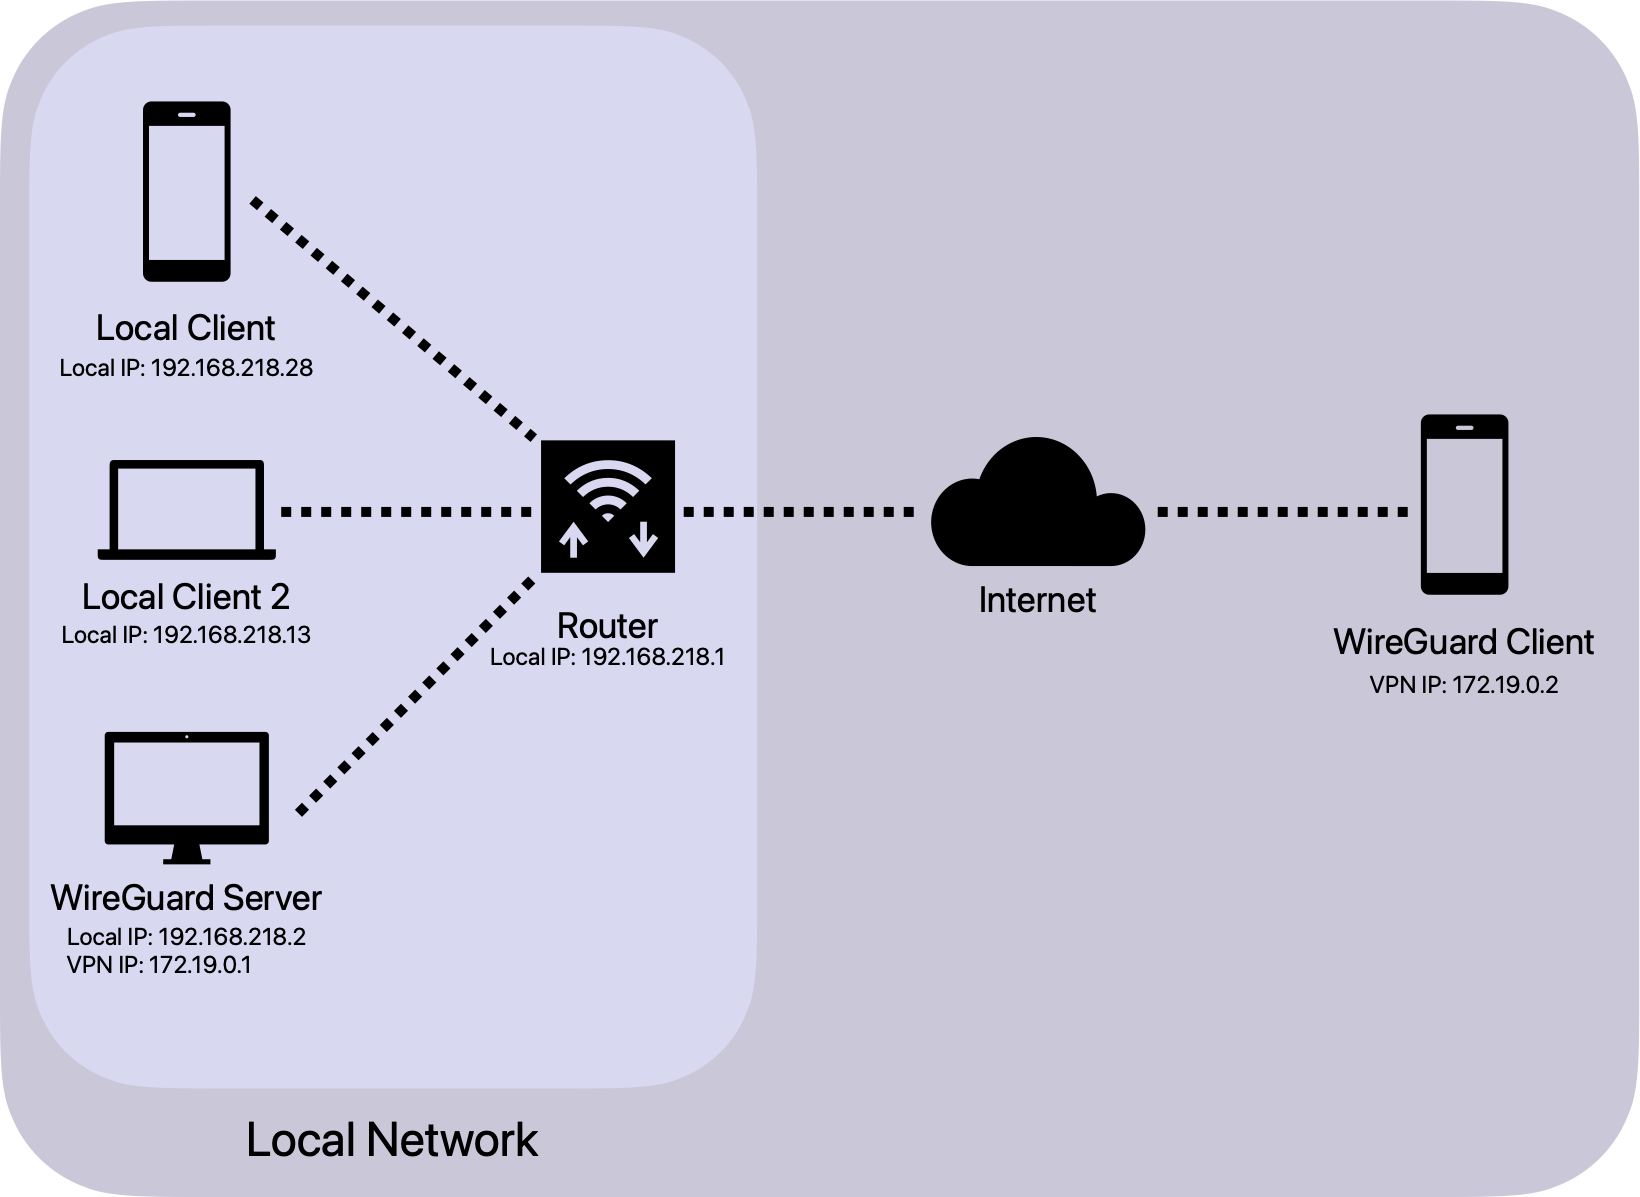
The purpose of this text is to serve as a guide for setting up a WireGuard VPN on an existing Linux server. Other than providing a secure way to access the internet from untrusted networks without relying on third-party VPN solutions, self-hosting a VPN makes remote access to a local network, such as a home network, possible. This enables a breadth of possibilities, ranging from remote technical assistance or file system access to even videogame streaming.
Prerequisites
Before getting started, some prerequisites should be mentioned:
- This guide has been written with the intermediate-to-advanced technical user in mind. Moderate knowledge about networking and Linux systems is expected, including interacting with the command line shell.
- Root access to a Linux server is required to follow this guide. Whether it be a spare computer, a virtual machine or even an existing desktop installation is up to the reader to decide.
- Full control over the local network in which WireGuard will be set up will be necessary.
- This local network must be exposed to the internet. Some internet service providers use carrier-grade network address translation (CG-NAT), which makes it impossible to connect to a domestic router from the internet. It is often possible to opt out of CG-NAT by contacting the carrier.
- In case the router does not have a static external IP, which depends on the carrier, a Dynamic DNS (DDNS) service will be necessary. Refer to the section Finding the Server's Public IP for further instructions.
- The router must support port forwarding.
WireGuard Configuration
This chapter outlines the procedure necessary for configuring WireGuard on both a server and one or multiple clients. It covers creating the configuration directory structure, setting the appropriate permissions to prevent unauthorized access to private information, generating key pairs and pre-shared keys and, finally, writing the configuration files and distributing them to the clients.
Installation
Refer to WireGuard's installation page for installation instructions for various Linux distributions and other operating systems.
Configuration Directory
Permissions
The WireGuard server's configuration and other related information such as keys and client configuration files are stored in /etc/wireguard. This directory likely won't exist yet, as it usually needs to be created manually.1
In order to protect the sensitive information that the configuration directory will contain, it is essential to set the access permissions and ownership accordingly, which should be done before creating the directory structure. More specifically:
- The user and group owner of the directory and its contents should be root:root.
- Only the root user should have read and write permissions to files inside the directory.
- (Optional) It would be a good idea to store the directory on an encrypted partition, as it would otherwise be possible for an attacker with physical access to the computer to boot from a USB stick and mount the partition as the root user. This would, in turn, grant full access to all of the private keys and all other information stored on the disk.
These constraints make it necessary to follow the rest of the guide from a privileged shell session, logged in as the root user.2 This will also ensure that all newly created files and directories are owned by root:root by default.
su -      # Try this first
sudo su - # Or this in case the above command fails
All that remains is to set the correct permissions for the current shell session, which can be achieved via the umask command.
umask 077The above command gives the user owner of all newly created directories read, write and execute permissions, but files will only get read and write permissions. This is the desired outcome, made possible by a security feature in Linux preventing files from being given execute permissions by default.
Directory Structure
With the permissions in place, the directory structure can now be created. The example below shows the recommended approach to organizing it, but other structures are also possible. For the moment, only subdirectories should be created.3 Keys and configuration files will be created in the following sections.
/etc/wireguard
├── clients                     // Client config files
│   ├── client1.conf
│   └── client2.conf
├── keys                        // Client and server keys
│   ├── client1
│   │   ├── client1             // Client1's private key
│   │   ├── client1.pub         // Client1's public key
│   │   └── server-client1.psk  // Client1's pre-shared key
│   ├── client2
│   │   ├── client2
│   │   ├── client2.pub
│   │   └── server-client2.psk
│   └── server
│       ├── server
│       └── server.pub
└── wg0.conf                    // Server config file
Key Generation
WireGuard uses OpenSSH-inspired key pairs for authentication, as opposed to SSL/TLS certificates or other more complex authentication methods employed by some of the alternatives. These keys are saved to files for convenience, but WireGuard will only read them from its configuration file.
This section covers the creation of public/private key pairs for the server and a client, referred to as client1. This process can be repeated for as many clients as necessary. Later, the purpose of pre-shared keys, an optional security feature, will be explained, along with the instructions to generate them.
Key Pairs
The process of generating keys for both the server and clients is the same, with the only variation being the directory in which they'll be stored and the file name used. To generate the keys, first a private key is created, and then the corresponding public key is derived from it.
wg genkey > server               # Private key
wg pubkey < server > server.pub  # Public key
In the example, the word server can be changed to any other name, such as client1.
Configuration Files
WireGuard is configured through plain text files in a simple, human-readable format. These files contain an [Interface] section and one or multiple [Peer] sections. The first describes the settings of the device that is being configured (client or server), while the latter specifies who its peer or peers are.
Server Configuration
The following code block shows an example configuration file for a WireGuard server that has two clients. The server is given its private key, gets assigned the internal IP address 172.19.0.1/164 and is configured to listen for connections on UDP port 51820, which is the default for WireGuard. In the [Peer] sections the necessary information for authenticating clients, including their public keys and preshared keys, is also specified.
[Interface]
Address = 172.19.0.1/16
ListenPort = 51820
PrivateKey = SERVER_PRIVATE_KEY

# VPN to Local Network Redirection
# Substitute "eth0" with the internet-facing interface
PostUp = iptables -A FORWARD -i %i -j ACCEPT
PostUp = iptables -A FORWARD -o %i -j ACCEPT
PostUp = iptables -t nat -A POSTROUTING -o eth0 -j MASQUERADE

PostDown = iptables -D FORWARD -i %i -j ACCEPT
PostDown = iptables -D FORWARD -o %i -j ACCEPT
PostDown = iptables -t nat -D POSTROUTING -o eth0 -j MASQUERADE

[Peer]
# client1
PublicKey = CLIENT1_PUBLIC_KEY
PresharedKey = SERVER_CLIENT1_PRESHARED_KEY
AllowedIPs = 172.19.0.2/32

[Peer]
# client2
PublicKey = CLIENT2_PUBLIC_KEY
PresharedKey = SERVER_CLIENT2_PRESHARED_KEY
AllowedIPs = 172.19.0.3/32
The "AllowedIPs" parameter is used to specify which IP addresses are allowed to communicate with the server. It acts as a whitelist, meaning that only requests coming from the IP addresses listed in the "AllowedIPs" parameter will be able to establish a connection and send/receive traffic through the VPN. In this case, the server will only accept incoming requests from client1 if its IP address is 172.19.0.2, or 172.19.0.3 in the case of client2.
Finally, the "PostUp" and "PostDown" lines are used to configure iptables rules to redirect VPN traffic to the local network, so clients in it are accessible from the VPN. They also enable VPN clients to access the internet through the server's public IP address. The "PostUp" lines will be run in sequence after the VPN is started, while "PostDown" lines run after the VPN has been stopped.
It is important to substitute eth0 in those lines with the server's internet-facing interface, in case it has a different name. This interface could have many different names, such as wlan0, wlp4s0, enp3s0, among many others. The correct name can generally be found using the ip command, by looking at the interface that is reported as being "UP".
ip -br lClient Configuration
What follows is an example configuration file for a client named client1. The majority of the lines are similar to those in the server's configuration file and will not be explained again. It is important to notice, however, that the [Interface] section now refers to client1, while the [Peer] section refers to the server.
Clients should have the server as their only peer. When adding new clients to the VPN, the corresponding [Peer] section must be added to the server's configuration instead. Clients can then communicate with each other through the server.
[Interface]
Address = 172.19.0.2/16
ListenPort = 51820
PrivateKey = CLIENT1_PRIVATE_KEY
DNS = 192.168.218.1

[Peer]
# server
PublicKey = SERVER_PUBLIC_KEY
PresharedKey = SERVER_CLIENT1_PRESHARED_KEY
Endpoint = SERVER_IP_OR_DOMAIN_NAME:LISTEN_PORT
AllowedIPs = 0.0.0.0/0, ::/0
The optional "DNS" parameter in the [Interface] section tells the client where to find the VPN's DNS server. In this case, it points to the router in the server's local network. This enables clients in the VPN to use local domain names to refer to clients in said local network, in case the router keeps an internal DNS record.
The "Endpoint" parameter is required, as it specifies the location of the server. Its value can be either an IP address or a domain name, followed by the port number on which the server is listening. The IP address or domain name and port number should be separated by a colon (:). For more information on how to obtain the server's public IP or a domain name that points to it, even if it changes dynamically, refer to the Network Configuration chapter.
In this case, the "AllowedIPs" line tells the client to accept all traffic comming from the server's side, no matter the source IPv4 (0.0.0.0/0) or IPv6 (::/0) address each packet comes from. In other words, all traffic is tunneled through the VPN, which includes accessing the internet through the server, and thus, the local network's router and public IP address.
It is also possible to configure the client to allow traffic only from the VPN and the local network, leaving all other traffic outside of the tunnel. For example, if one wishes to access a file located in a remote network while continuing to stream a video, the "AllowedIPs" line can be changed to the following.
AllowedIPs = 172.19.0.0/16, 192.168.218.0/24It is worth noting that it is entirely possible to maintain two configuration files on a client device: one that tunnels all traffic (i.e. client1.conf), and one that allows access to the remote local network only (i.e. client1-local-only.conf).
Client configuration files are kept on the server for convenience, but they can be safely deleted once copied to their respective devices. This transfer can be done in a multitude of ways, such as using rsync or scp, or manually (re)writing them on the device itself. In the case of mobile devices running iOS or Android, the qrencode command line utility can be utilized to generate a QR code to be read from WireGuard's mobile applications. This utility is packaged by many Linux distributions, including Debian/Ubuntu, Arch and Fedora.
qrencode -t ansiutf8 -r /etc/wireguard/clients/client1.confStarting the VPN
WireGuard can be quickly started and stopped using the wg-quick command, followed by the configuration file's name without the .conf extension. It is possible to have more than one configuration file on the server. For instance: a server that is also sometimes used as a client of a different VPN.
wg-quick up wg0
wg-quick down wg0
On distributions with systemd, wg-quick can also be used as a service. This allows for automatically starting the VPN on boot. The following command starts the VPN and enables it as a service. Similar to the wg-quick command, what follows the @ is the configuration file's name without the .conf file extension.
systemctl enable --now [email protected]Network Configuration
This chapter covers the remaining steps to set up a functional VPN using WireGuard. The majority of the configuration will be done on the local network's router. As each router model has different capabilities and configuration interfaces, general directions will be provided instead of specific instructions.
The first section addresses the issue of IP address overlap between external networks, the VPN, and the local network being accessed through WireGuard. With this problem resolved, the VPN server will be given a static IP within the local network. Then, instructions will be provided on how to reach VPN clients from a local device that is not a member of the VPN, both on a router (network-wide) and computer level. Finally, after finding the server's public IP address and configuring the firewall, forwarding WireGuard's "ListenPort" on the router will complete the VPN setup.
Preventing Network Overlap
It is not a good idea to have a local network with a common subnet such as 192.168.1.0/24 when using WireGuard to remotely access it, as this is a commonly used default for home networks. This means that there is a high likelihood that other external networks, such as a friend or family member's home network are using the same subnet. This can lead to IP address conflicts, which will cause routing issues and render the VPN useless. A possible solution is to choose a unique subnet for the local network, such as 192.168.218.0/24. Then, the probabilities of encountering another network using the same subnet are small enough that the problem can be considered solved.
As mentioned, each router is different, but the local network's subnet can usually be modified in the DHCP server's settings page. The table shows the usual parameters that most routers present.
| Option | Value |
|---|---|
| DHCP Server | On |
| Router's local/LAN IP Address | 192.168.218.1 |
| Subnet Mask | 255.255.255.0 |
| DHCP Start IP Address | 192.168.218.2 |
| DHCP End IP Address | 192.168.218.254 |
The VPN's subnet can suffer from this same problem, which is why the 172.19.0.0/16 subnet was chosen in the last chapter, instead of the more common 172.16.0.0/16. The reason for choosing a class B range is that home networks often use class C subnets, while businesses with large networks tend to utilize class A subnets instead. Class B subnets, while still widely utilized, are less common, and seemed appropriate for the VPN. Note, however, that this was an arbitrary decision and any other network could have been chosen instead.
Assigning the WireGuard Server a Static Local IP
Giving the server a static local IP is usually necessary in order to forward WireGuard's port on the router, as well as for routing local network traffic through the VPN server, which will be discussed in the next section. In some cases, MAC addresses can be used directly to identify a client for both use cases, in which case this section can be skipped.
Within the same DHCP settings page, most routers support assigning static IPs to clients, identified by their MAC addresses. This is sometimes called IP address reservation or DHCP binding. Clients' MAC addresses usually appear in the router's table of connected clients.
The WireGuard server's MAC address can also be found by running the ip -br l command on it. After following the instructions at the end of the Server Configuration section for finding the internet-facing interface's name, its MAC address will appear to the right of the word "UP", in the format ff:ff:ff:ff:ff:ff.
Reaching VPN Clients from the Local Network
A routing rule can be used to redirect certain network traffic through another device. This is often referred to as "Route", "Routing", "Routing Rule(s)", "Routing Table" or "Static Routing" by most routers. In this case, routing traffic destined for the VPN's 172.19.0.0/16 subnet through the VPN server enables local clients that are not connected to the VPN to communicate with VPN clients. This is the reverse of what the "PostUp" and "PostDown" lines accomplish in the VPN server's configuration file, which allow VPN clients to access the server's local network.
In case setting static routing rules on the router for the whole network is not desired or not supported, they can instead be set on a per-client basis. On Linux, this can be achieved with the ip command, although the static route will be forgotten when rebooting by default.
Static routing on a router:
Option Value Interface (LAN/WAN) LAN Network 172.19.0.0 Subnet Mask 255.255.0.0 Gateway VPN Server's local IP or MAC Address - Static routing on Linux:5
ip route add 172.19.0.0/16 via VPN_SERVER_LOCAL_IP dev INTERFACE_NAMEFinding the Server's Public IP
In order to connect to the WireGuard server from outside the local network, knowing its IP address is necessary (the router's public IP), as it needs to be set in the "Endpoint" parameter in clients' configuration files. It can be found via the following command.
curl ifconfig.me && printf '\n'However, it is likely that the router's IP address changes dynamically over time. In that case, using a Dynamic DNS (DDNS) service will be necessary. By creating an account with one of the multiple DDNS service providers, it is possible to configure the router to notify them every time its public IP address changes. This way, the provider will maintain a domain name that always resolves to the router's current IP address.
The DDNS option can be found in the "WAN", "Internet" or "Security" section in most routers. No-IP is often included as a DDNS service provider, which allows for up to three free domains, but other alternatives exist. In case the router has no support for DDNS at all, it is still possible to use this service through a script running on the Linux server, but that is outside the scope of this guide.
Firewall Configuration
Before forwarding WireGuard's port on the router, it is a good idea to set up a firewall on the Linux server. The most common options for this are the Uncomplicated Firewall (UFW) and firewalld. Since UFW is the simpler option as well as the default firewall in Ubuntu Server, one of the most common server distributions, instructions will only be provided for it.
It is possible to uninstall or disable firewalld and replace it with UFW in distributions that use it, such as Fedora.
dnf --assumeyes install ufw
systemctl disable --now firewalld.service
systemctl enable --now ufw.service
The following lines configure UFW to allow all incoming traffic from the local network and the VPN, and limit6 traffic coming from the outside on UDP port 51820, which WireGuard is listening on. All other traffic will be rejected.
ufw enable
ufw allow from 192.168.218.0/24
ufw allow from 172.19.0.0/16
ufw limit proto udp from any to any port 51820
Now, running ufw status as the root user should return the following table (the order of the lines may vary).
| To | Action | From |
|---|---|---|
| Anywhere | ALLOW | 192.168.218.0/24 |
| Anywhere | ALLOW | 172.19.0.0/16 |
| 51820/udp | LIMIT | Anywhere |
| 51820/udp (v6) | LIMIT | Anywhere |
Port Forwarding
Port forwarding is the final step in this guide. It tells the router to redirect all internet traffic targeting a specific port (51820 UDP) towards the WireGuard server, as opposed to handling that traffic itself. This makes it possible to reach the server from the outside, making the VPN functional.
This option is sometimes also referred to as "Virtual Server" by some routers. It can be inside the "WAN", "Internet", or "Security" section of the router's configuration interface.
| Option | Value |
|---|---|
| Name | WireGuard |
| Protocol | UDP |
| WAN Host IP Address/External Source IP | 0.0.0.0 - 0.0.0.0 (or leave empty) |
| LAN Host/Internal IP Address | VPN Server's local IP or MAC Address |
| External/WAN Port | 51820 - 51820 |
| Internal/LAN Port | 51820 - 51820 |
Conclusion
In conclusion, configuring WireGuard is a complex process that requires a certain level of technical understanding. The present guide has provided a comprehensive overview of the steps involved, in an attempt to facilitate said process. By following it, the reader should now have a fully operational WireGuard VPN in place.
Still, the network should be tested and maintaining its security has to be taken seriosly, as having any device with ports open to the internet poses a considerable risk to users and the sensitive information their devices may contain. Regular monitoring and updating is therefore strongly recommended.
In case the directory structure already exists, the correct permissions can be set by running the following commands.
chown -R root:root /etc/wireguard
find /etc/wireguard -type f -exec chmod 600 {} \;
find /etc/wireguard -type d -exec chmod 700 {} \;Usage of the sudo command as a regular user is also possible. However, since most commands will require root privileges, running them directly as the root user seems more practical.
If not following the recommended structure, one should note that the file /etc/wireguard/wg0.conf cannot be relocated to a subdirectory. It can, however, be given a different name, although wg0.conf is the standard for the server configuration file. Keep in mind that the .conf file extension cannot be changed either.
The reason for choosing the uncommon 172.19.0.0/16 class B subnet is given in the section Preventing Network Overlap in the Network Configuration chapter, along with similar recommendations for the local network.
INTERFACE_NAME is the name of the network interface that connects to the same local network the VPN server is on. Again, it can be found using the ip -br l command.
In the context of UFW, "to limit" means to let the traffic through, but temporarily ban the source IP if it doesn't authenticate in a number of attempts.